How to setup load balancer with Elastic file system (EFS) in AWS? Part 4
5 min read. Jun 19, 2022
Hello everyone, we’re going to solve the last piece of the puzzle in this article. But before that let’s ponder why you should use EFS over other AWS storage services.
Why EFS?
One of the main reasons to use EFS is that it is elastic, meaning that you don’t have to provision the infrastructure for storage everytime you want to add more data. The file system grows and shrinks based on the amount of information stored in it. Apart from that EFS is based on a network file system (NFS) and it can be accessed from multiple EC2 instances concurrently.
Now, we’ve found the reason why we should use EFS, let’s get started.
The following steps can be followed to configure the EFS with EC2 instances behind the load balancer.
- Create EFS service
- Install NFS client on EC2 instances
- Mount EFS on the EC2 instances
- Configure security groups
- Persistent mount for reboots
Create EFS service
In the AWS management console, search EFS on the search bar and click on the link to Elastic File System dashboard. Then click on the Create file system button on the top right. Give a meaningful name to the file system and select the VPC that we’ve created in the second article. Leave the default option as Regional for the Availability and durability section as it’ll store the EFS in multiple availability zones. We’re good to go now so click on the Create button.

Install NFS client
The next step is to install an NFS client on the EC2 instances. As EFS is based on a network file system, we need to install an NFS client on each of the EC2 instances where we want to mount the EFS volume.
Command to install NFS on Debian based Linux:
$ sudo apt-get update$ sudo apt-get -y install nfs-commonCommand to install NFS on Amazon Linux AMI, Red Hat Linux AMI or CentOS:
$ sudo yum update -y$ sudo yum -y install nfs-utils
Mount EFS on the EC2 instances
Unlike EBS which comes attached with the EC2 instances during the creation of the instance, we need to mount or attach the elastic file system to each of the EC2 instances from where we want to access the file system.
Alright enough talking, let’s mount this bad boy to our EC2 instance in the private subnet.
Click on the file system recently created from the EFS dashboard and click on the Attach button on the top-right section. A pop-up box will appear with commands to mount the EFS on a Linux instance.
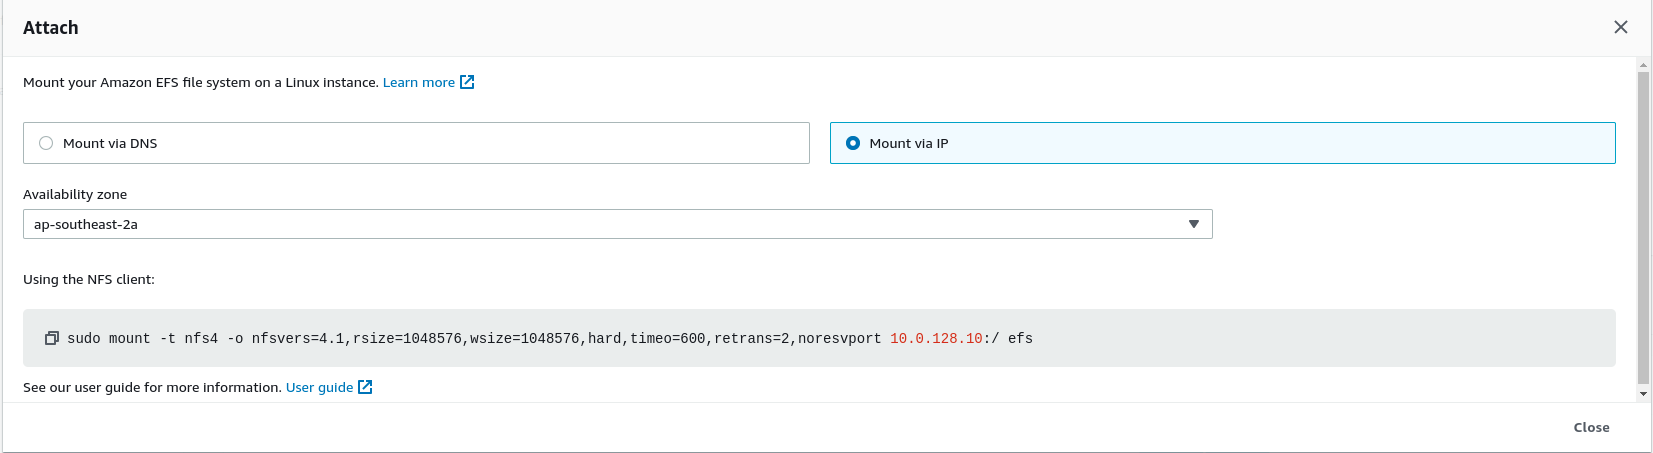
There are multiple ways to mount the file system however I feel the options to mount via IP is the simplest of all.
Now SSH into your EC2 instance in the private subnet through bastion host or jump box. Then create a directory where you want to mount the EFS file system.
For example, if you want to mount the EFS in the deployments directory of your ssh user’s home directory (ubuntu in case of Ununtu OS), then run the following commands.
$ mkdir deploymentsI would recommend copying the mount command based on where your EC2 instance is launched. For example, if your EC2 instance is hosted on 2a availability zone of the VPC then select 2a from the availability zone drop-down and copy the mount command.
$ sudo mount -t nfs4 -o nfsvers=4.1,rsize=1048576,wsize=1048576,hard,timeo=600,retrans=2,noresvport <replace with your IP>:/ deployments
Configure security groups
In order to allow the communication between EC2 instances and the EFS volume, we need to configure the security group rules on both EC2 instances and the EFS.
On the selected EFS, click on the Network tab at the bottom and click on the Manage button. Now, copy the security group ID and open the EC2 management console and click on the Security Group link under Network and Security section. Search for the security group associated with EFS and edit its inbound rule.
| Type | Protocol | Port | Source | |
| NFS | TCP | 2049 | Custom | <Either select the security group associated with EC2 instance or add private IP address of EC2 instance> |
If you prefer to add the IP address of EC2 instance on the source field then you need to add the IP address of each EC2 instance on the inbound rule of EFS security group.
Similarly on the security groups associated with EC2 instances, add the following outbound rule.
| Type | Protocol | Port | Destination | |
| NFS | TCP | 2049 | Custom | <select the security group associated with EFS> |
Persistent mounting on reboots
The mount command that you issued earlier is not persistent on EC2 instance reboot. Therefore, you need to add the mount command on /etc/fstab file in order to make it persistent. One important thing to note here is that since we’ve used NFS client for mounting in CLI therefore we need to use the same NFS client in /etc/fstab as well.
Open the /etc/fstab file on each of the EC2 instance where you’ve mounted the EFS and add the following command at the end of file:
<ip_address used during mounting>:/ </path/to/mount/dir> nfs4 defaults,_netdev 0 0
Wrapping up
In this last part of the four part series, we’ve configured the elastic file system on the EC2 instances behind the load balancer. At first, we created the elastic file system on the VPC that was created in the second article. Similarly, we installed the NFS client on the EC2 instances and mounted the EFS on them. Moreover, we also configured the security groups to facilitate the communication between EFS and EC2 instances and lastly added the mount command on /etc/fstab file for persistent reboots.
I hope these articles were helpful and added some value to your devops skills stack.
If you’ve any questions, get in touch with me.
Thanks and Happy coding!
References
https://docs.aws.amazon.com/efs/latest/ug/mounting-fs-old.html#mounting-fs-install-nfsclient
https://stackoverflow.com/questions/52558062/auto-mounting-efs-on-ec2-instance
https://docs.aws.amazon.com/efs/latest/ug/troubleshooting-efs-mounting.html
https://docs.aws.amazon.com/efs/latest/ug/troubleshooting-efs-mounting.html